What is NGINX ?🤔
5th Blog

DevOps enthusiast | Open Source
Hey guys, how are you all doing?
If you are new to my blog profile, I am Chris Jonathan and I'm currently learning DevOps and writing some good blogs on all my learnings. So, please check my previous blogs for good DevOps content blogs.
Well, today I'm going to cover a topic that actually should have been written before Docker. But I've missed out on that😕. So, that is the NGINX Web Server.
Let's get started👇
What is a Web Server?

Now, let's consider a scenario,
Have you ever wondered what happens when you type in the URL section of any browser?
When you type in a URL, a request is generated to a computer connecting those web pages. So when that computer initiates a response containing the webpages that you’ve requested for, these webpages generally travel through the GAN(Global Area Network) and reach your LAN(Local Area Network) and finally to your browser.
So, the computer which is serving you with the webpage is nothing but your Web Server.
Web servers are computers that deliver the requested web pages. Every web server has an IP address and a domain name.
When you use a web server you need software applications that can make your computer a web server.
If you want to make your computer a web server you have to install server softwares and connect the machine to the internet which is the GAN.
So, in the market, there are many web server softwares like XAMPP, Apache, Tornado, Caddy, Microsoft IIS and lastly NGINX the one we're going to cover.
Intro to NGINX
What is Nginx?
It is an open-source, fast, lightweight and high-performance web server that can be used to serve static files.
Why should we use Nginx?
NGINX provides various services such as reverse proxy, load balancer, and caching.
The Reverse proxy accepts a request from a client, forwards the request to a server that can fulfill it, and returns the response from the server to the client.
A Load balancer distributes the incoming client requests to a group of servers, in which it can handle concurrent requests without experiencing load on a particular server.
Caching is a technique that stores a copy of a given resource and serves it back when requested.
Nginx can handle logging, blacklisting, load balancing and serving static files while the web services focus on what they need to do.
The configuration of Nginx is easier than Apache httpd. Nginx was designed for high concurrency and it is very fast.
How does NGINX work?
Nginx works on event-driven, asynchronous, and non-blocking model and it is a simple Master-Slave architecture.
Nginx Architecture
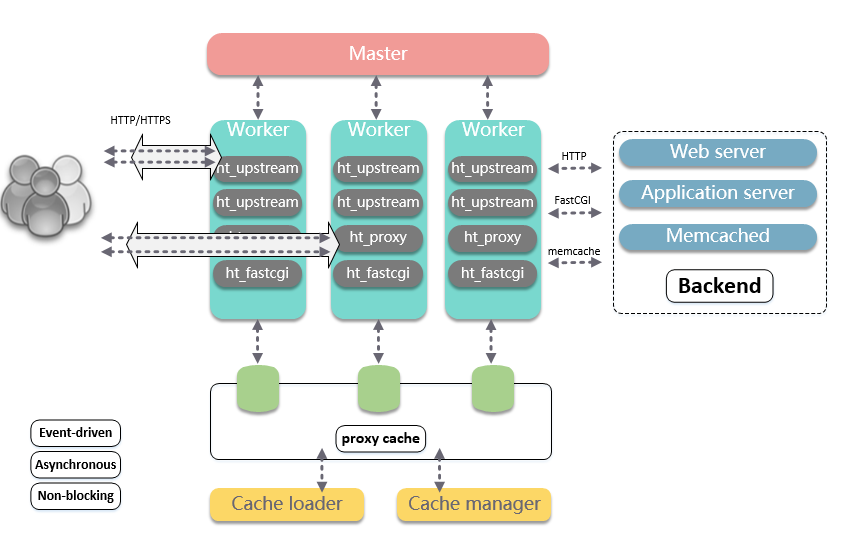
It has one master and has various worker nodes working for it and you can use these worker nodes for processing thousands of requests at a time.
Master process is responsible for reading and validating configuration. It is also responsible for starting, terminating and maintaining the configured number of worker processes.
Master node is also responsible for reconfiguring without any service interruption. It also controls non-stop binary upgrades and re-opening of the log files and also compiles embedded perl scripts.
Proxy Caching allows a server to act as an intermediary between a user and a provider of web content. When a user accesses a website, proxies interpret and respond to requests on behalf of the original server.
Cache loader and Cache manager look into which page are you searching for and they send you back the page immediately.
Nginx Configuration Settings
Nginx divided its job into the worker process and worker connections.
Let's see an example for an Nginx server handling concurrent MP3 and MP4 file requests:-

From the above diagram, we can see that a single worker connection can handle around 1024 connections at a time. There may be 'n' numbers of the worker process in Nginx based on the type of server we have and each worker process handles different jobs so that it can handle more numbers of concurrent requests.
Finally, the worker process transfers the requests to the Nginx master process which directly responds to the unique requests only.
Since worker connection can take care of up to 1024 similar requests. Because of that, Nginx can handle thousands of requests without any difficulties. It is also the reason why Nginx became an excellent server for busy websites like e-commerce, search engines, and cloud storage.
The main settings required for Nginx are stored in a file named nginx.conf. This file is mainly structured into many contexts.
worker_processes: A worker process is the number of workers that a master will control. So if you have a multi-core processor like 8-cores, you can set 8 worker_processes to fully utilize disk bandwidth and help it in doing CPU-intensive work.
worker_connections: It is the number of simultaneous connections with different clients. The default is 512 or 1024. So, suppose you have 8 worker_processes and 512 worker_connections, the maximum number of clients you can serve is worker_processes * worker_connections, i.e. 8 * 512 = 4096 connections.
Note: The bigger it is the more simultaneous users the Nginx would be able to serve.
access_log & error_log: By default, the Nginx server writes its events in 2 types of logs as mentioned. The activities of all visitors, requesting data from the server are logged in access_log, you can find which files were accessed and how Nginx responded to them, the IP of the client, and a lot more. But if Nginx faces any issues and glitches, then it will log all this information in the error log for further debugging.
Note: These logs are generally reviewed for debugging and troubleshooting.
gzip: If you want to juice out as much performance as available, it compresses all the response data. but it uses extensive CPU resources, which can slow down your Nginx if you use this on all items, so keep this option up and running only for large items.
Now, that we know all the internal working, let's see the outline of the Nginx architecture in a go.
What happens when you search for any item on the webpage?
HTTP request is generated to the Nginx architecture.
Now the master selects which worker must take up this process and then dedicates this process to a specific worker.
Now, the worker works on it and then it fetches the webpage from the web server and then it finally sends you back the response.
Features of Nginx
It improves content and application delivery, improves security, and facilitates scalability and availability for the busiest websites on the internet.
By using Nginx you will make sure that your page load time is reduced.
It provides scalability
It improves load balancing
Upgrades can be done while Nginx is hosting a website without any downtime.
Ease of Installation and maintenance
Deploying a Web Application using NGINX
Installing Nginx
Steps to follow are:
Install Nginx
Adjust Firewall
Check your server
Firstly, open the terminal in your Linux distro and then use the below commands:
# Update your system
sudo apt-get update

# then install Nginx
sudo apt-get install nginx

# Enabling Firewall
sudo ufw enable

Now we need to add the rules to the firewall so that your server can get requests on Http and Https ports.
# check the nginx version
nginx -v

# the below command tells you all the configuration that your firewall know
# which can be added
sudo ufw app list

# add the following rules from available options using the below command
sudo ufw allow 'Nginx Full'
sudo ufw allow 'Nginx HTTP'
sudo ufw allow 'Nginx HTTPS'

# now check the status of rules you added whether they are added to firewall
sudo ufw status
Now check the status of the server whether it is running or not
sudo systemctl status nginx

If we get the status as active and running then it means the stage is set for the deployment.
Deploying a web application using Nginx
Firstly, I created a basic web application named Testing.html which looks like this 👇
<!DOCTYPE html>
<html>
    <title>
        Demo Website
    </title>
    <body>
        Hello, I have successfully deployed this web application using NGINX.
    </body>
</html>
So I need to deploy this using Nginx on a remote server.
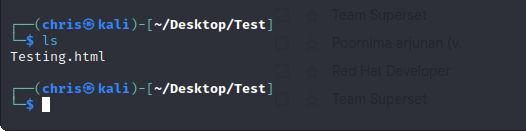
I saved this Testing.html file in a folder names Test
Now open the terminal in Linux and change the directory to where the application is present using the following command
cd ../Desktop/Test
Now, to go ahead we need to install Curl, Open SSH-server, and vim editor in your distro.
So, why are these used?
Curl - CLI tool used to transfer data from a web server
OpenSSH-server - a collection of tools that are used for the remote control and transfer of data between remote networked computers.
Vim-editor - It is an editor that is used to create and modify text files.
# install all the three libraries using below commands
sudo apt-get install curl
sudo apt-get install openssh-server
sudo apt-get install vim
Now in this step, we will copy our web application folder to this absolute path /var/www
sudo cp -r Test /var/www
Now, we will point our domain name to the server where we will host this application. i.e. we need to add the IP address of your server to the DNS settings. Let’s suppose your server IP address is 0.0.0.0 and your domain name is www.demo.com, then your domain name should point to your server IP address.
For that we need to also do some settings in server, we need to create a file, we will use vim for that
# Firstly, change your directory to var/www/
cd var/www

# Vim command for new file
sudo vi /etc/hosts
Now, the vim editor will be opened and initially it looks like this👇
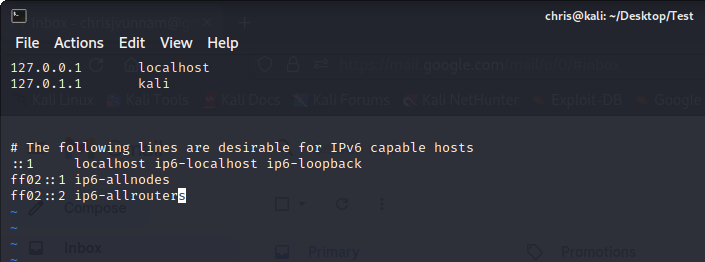
Now, adding Ip address 0.0.0.0 and domain name www.demo.com in the editor
To enter into insert mode in editor, type "i"
After adding, it looks like this👇

After adding, to save and exit the editor, type "esc" and there will be a prompt in the bottom left of the editor and there type ":x" or ":wq" and you will be back to terminal
Now, we need to add our web application folder to that server. For that, we need to change the permission of our web application folder.
# Change directory to /var/www/test
cd /var/www/Test

# Change permission for your folder
sudo chmod -R 777 *

# Secure copy your files to web server
# (Your IP address of server will be different)
# (eg: scp -r * root@x.x.x.x:var/www/FOLDER_NAME)
scp -r * 0.0.0.0:/var/www/Test
So our files have securely been copied to the server.
So now, we will configure our Nginx Server to serve our website, let’s check the Nginx folder
# Change directory
cd /etc/nginx

# See Contents of it
ls
Here we should be interested in 2 directories, sites-available and sites-enabled.
sites-available: It contains all the individual config files possible for all your static files.
sites-enabled: It contains the link to config files that Nginx will read and run.
So we need to create a config file in sites-available and a symbolic link in sites-enabled for Nginx.
Firstly, we will create a new file and add the following contents to it.
# Command to create and open a new file
sudo vim sites-available/Test

# Now add the following contents to it
server {
listen 80 default_server;
listen [::] default_server;
root /var/www/Test;
index Testing.html;
location / {
try_files $url $url/ =404;
}
}
Here we have opened socket 80 and your application port for default_server, we have told Nginx where our web application files are. Location of our Index page, and if you get some wrong URL then through a 404 error.
Now let us add this file to the sites-enabled folder in Nginx
# Command to add file to sites-enabled folder
sudo ln -s /etc/nginx/sites-available/Test /etc/nginx/sites-enabled/Test
Now we have one main issue, as earlier we had our Nginx server running, and we configured to open port 80 in our web application, and Nginx is also trying to open its default page using port 80. Hence we need to move that default files to somewhere else to avoid conflict.
# I generally move it to home directory
sudo mv /etc/nginx/sites-enabled/default /home/chris/default

# Restart Nginx service
sudo systemctl restart nginx
So, we have restarted our nginx server now
Now, we have two ways to test whether all this process has actually paid off
1st way - go to the browser and type our Ip address(0.0.0.0) or domain name(www.demo.com) and if we get our website then we have successfully done it

2nd way - use the curl command
 curl www.demo.com
# or we can give the IP address here of our server
curl 0.0.0.0
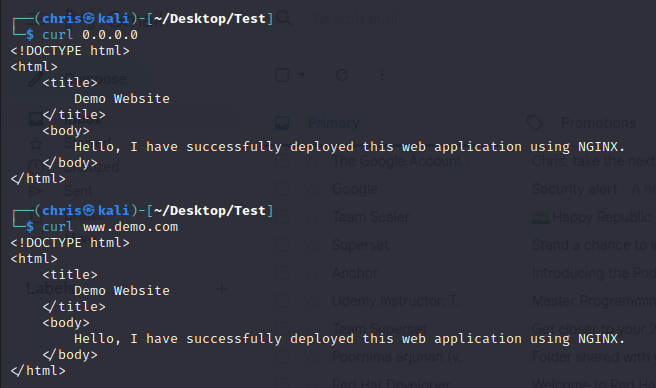
Congrats! if you have got the desired output.
We have successfully deployed our web application using NGINX web server!
Resources:
I'm also attaching few links that helped me in the entire learning process. And also you may get many errors and get frustrated during the learning process and I hope these links may come in handy.
Start, Stop, and Restart Nginx with systemctl - when you get [nginx.service: disabled] error
That's it for the blog guys. I hope you had a great read and actually learned some useful stuff about NGINX.
I'll be back with some amazing DevOps blogs in MyDevOpsJourney
THANK YOU😊
Contact me:
Linkedin: https://www.linkedin.com/in/chris-jonathan/
Twitter: https://twitter.com/Chris__Jonathan


